Prototype drawings (also called Templates) are designed to make the start-up phase of creating a new drawing quick and easy. They are drawings that have many pre-loaded settings that other programs would require you to set up. These settings include, but are not limited to, line weights, layers and dimension styles for many scales and paper sizes. Choosing one of DynaScape Design’s many prototypes will allow you to begin work on drafting your plan immediately.
As you evolve as a DynaScape Design user you may wish to alter the existing prototypes or add new prototypes to the program, which DynaScape Design will allow you to do. However, we strongly recommend that you leave such advanced modifications for later and start your first projects using the default prototypes that shipped with the software.
Opening a Prototype Drawing (Template)
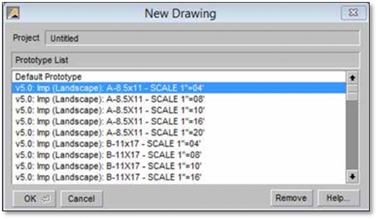
Select the first button (or icon) in the Top Button Bar, “Activate a new drawing” to open the New Drawing panel.

The New Drawing panel, as shown below, displays the list of all available prototype drawings.

The scroll bar on the right side of the list allows you to see all the prototype drawing names. The list is sorted alphabetically by name and by page size (from smallest to largest); metric prototypes are located at the bottom of the list.
Understanding Prototype Drawing Names
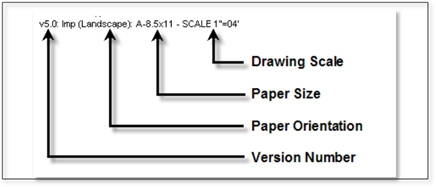
The names given to the various prototypes are designed to help you choose the drawing scale and page size you need. Each name has four components:

In the example above:
• The prefix “v6.0” shows that this is a DynaScape Design Version 6.0 prototype (Default). Because the list is sorted alphabetically, if you decide to create your own prototypes you should preface them all with a unique version name (for example: Company Name) so that they can be easily identified
• The paper size shows that this prototype is designed for an 8-1/2” x 11” sheet of paper
• The page orientation is landscape (page is displayed horizontal); other prototypes have portrait orientation (page is displayed vertical)
• The drawing scale of this prototype is 1” = 4’ (1 inch = 4 feet), which is equivalent to 1/4” = 1’-0”.
How to Choose a Prototype Drawing
1. Determine the printer format that you will be using for the final printout of the plan. For example, large-format printers will print on C- and D-size sheets; standard desktop printers will print on letter-size (8.5” x 11”) paper, while some will print on tabloid (ledger) size sheets (11” x 17”).
2. Consider the true size of the area that the plan will cover to help determine the scale of prototype you should choose. If you are doing a design for a backyard that is approximately 80 feet x 60 feet, for instance, then you should choose a prototype that will accommodate that area. A good general rule of thumb is to choose the lowest scale possible so that the plan (including your labels and title block) will fill the page, and design details will be as large as possible. For an 80 feet x 60 feet area printed on 8.5” x 11” paper, you would choose a prototype with a 1” = 8’ scale.
3. Choose between landscape or portrait orientation. Again, this will be determined by the size and shape of the project you are designing.
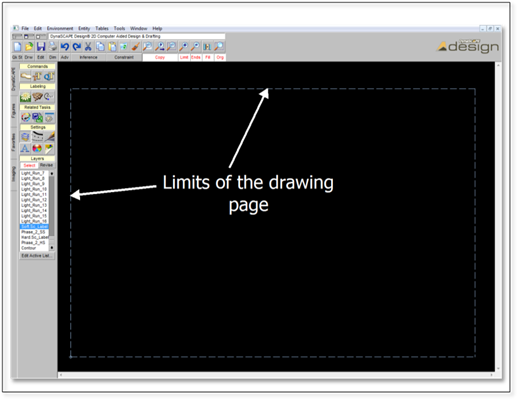
To choose a Prototype to work with, select the prototype name and then click [OK]. The New Drawing window with the Prototype list will close and a new (blank) drawing will open in the Drawing Window. The blue dashed rectangle that is displayed in the Drawing Window shows the limits (physical edge) of the drawing page. You should draft your plan within these limits so that when you print your drawing on the same size of sheet you chose as your prototype, your drawing will be at the correct scale you chose with your prototype.
In DynaScape Design, scale is relative to sheet size. When you change your drawing scale, DynaScape will adjust your drawing so that when you print to the same size of paper as your drawing page setting, the printed drawing will be at the correct scale for measuring.
