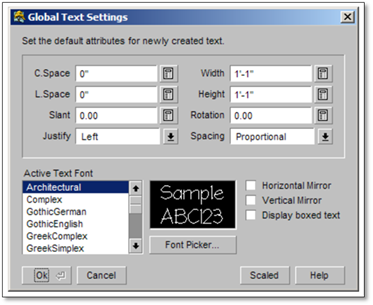
There are two types of text that can be inserted into a drawing, and each has their own default (Global) settings that control them:
1. Plain text without a leader (Text).
2. Text attached to a leader or dimension (Dimension Text).
If you open the Insert Text tool modifier you can change the values for Width and Height in this panel now, but the change would only affect the string(s) of text that we are entering at this time. The next time the text Modifier is opened, Height and Width it would again be set to the Global setting (default).
To change text size default (globally) so that the revised text sizes (or fonts) will appear each time you open the Insert Text tool, follow these steps:
1. Select the pull-down menu Entity | Text to open the Global Text Settings panel.

2. Change the values for text Width and Height (e.g., 11”) in the Global Text Settings panel to your new values. You can also change the Global text font style if you wish.
3. Select OK to save the change and close the panel. From now on, as long as you are in this drawing, each time you open the Insert text tool these will be the default settings.
 Important:
If the Scaled/Absolute toggle is set to “Absolute” in the panel, click it to change it to “Scaled”. Nearly all your work will require this control set to “Scaled”.
4. Return to the Draw Toolbox and click the Insert Text button to open the Modifier. Notice how the default values for text Width and Height are now set to the new value of 11” and the default text font is now Cityblueprint.
The changes made in the Global Text Settings panel will remain in force in this drawing until (or unless) they are changed again by using the same method.
 Important:
It is, of course, possible to change more than just the values for text height and width; you may also change the default font, spacing and justification controls and other settings. To learn more about these control settings, select Help in the lower-right corner of the panel or press [F1].