When you begin a DynaScape drawing you select a prototype drawing in which to start from. Each prototype drawing in DynaScape comes “pre-loaded” with many settings already in place. For example, when you start a new drawing using the DynaScape prototype the layers are predefined for color, weight and style. The font style and size are predetermined. Arrows, leader line and other dimension settings are preset. In short – all the basic drafting principles have already been set out for you.
However, you may wish to customize your drawing sheet (prototype). Perhaps you don’t like the font we have set or want to add more layers you are using on a continual basis. You may also want to include your company logo or any disclaimers that you put on each and every drawing, saving you time in setting this information up each time you start a new drawing. Another common reason for creating a prototype is to add a certain sheet size and/or scale that we may not have included.
Below is a list of instructions that will walk you through the steps required for creating a new prototype. Remember that you will need to make the changes to the various settings in DynaScape to make your prototype work. Also remember anything you see on your drawing screen will be included in your prototype so be careful not to leave any stray entities behind.
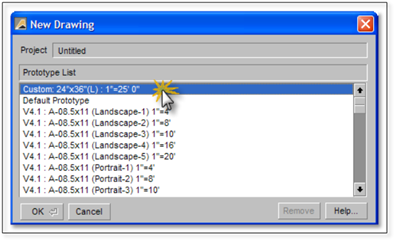
1. Open the Prototype of the drawing (which closely resembles) you wish to change – for example, in this case you want to use the 24x36 size paper at 1”=25’-0”.
2. To go about making any changes you want to the prototype itself. This may include:
Scale: Go to Environment > Drawing Page... and set the Sheet Size, Scale and Units you wish to use.
Text Size: You need to test which is the appropriate text size for the scale of this prototype before you save it. You need to set it in two places: go to Entity > Text... (this is the global setting for all text with no leader) and then Entity > Dimension... >Text... (this is for text attached to a leader or a dimension).
Layers: You may wish to include a new layer or revise the properties of existing layers. Go to Table > Layers... and make your changes to the layer list.
Line Styles: You may wish to modify existing line styles or add new ones. Go to Tables > Styles... and make your changes.
Line Weights: You may wish to modify existing line weights or add new ones. Go to Tables > Weights... and make your changes.
Titleblocks or Logos: You may wish to have a titleblock or logo appear with the new prototype. Titleblocks must be a figure from the Figures tab in order to be able to use the Titleblock Editor. Once in the saved prototype, none of the geometry in this objects can be edited.
3. Before saving the new prototype, make sure the drawing page is clean (no unneeded geometry). Make sure the drawing limits are set to the maximum view (Zoom drawing to best fit). Turn on the layers you wish to be visible each time you open the new prototype.
4. It is now time to save the new prototype. Go to File > Save As > Prototype.
5. This will open up a panel. Click on the Prototype button. If you have not already been pointed to the Seeds folder, you will need to navigate here – prototypes must be saved here: C:\Documents and Settings\(User Name)\My Documents\DynaScapeDS\Seeds. Here you will see the “code names” of all the various prototypes. At this point it does not matter what you name the file. However, for reference sake, our naming system is:
AC IMP L 8.SED means Architectural C-size Paper (18x24). IMP means it is imperial as opposed to metric, L means landscape orientation and 8 refers to the scale of 1/8”=1’-0” .SED is the file extension which is automatically added.
6. After typing the name of your new prototype click OK.
7. Next, type in your Descriptive Text name to identify it in the Prototype list in DynaScape.
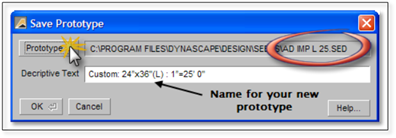
Make sure it is recognizable because this is the name you will see. For example:
Custom: 24”x36"(L) : 1”=25’ 0" means this is a Custom drawing on 24”x 36” paper at a 1” = 25’ 0” scale.
Click Ok.
8. Now that you have created your new prototype it will be part of the list of prototypes available to you when you start a new drawing. Note that the list of prototypes available is sorted alphabetically.