Follow these steps to insert a plant label into your drawing using one of the measuring tools in the Plant Labeling Tool:
1. Choose the plant name you wish to use on your label.
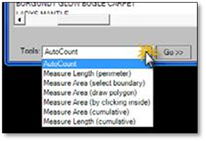
2. Select one of the measuring tools found in the menu under AutoCount at the bottom of the panel and click on the Go>> button. The labeling panel will temporarily minimize, giving you full view of your drawing for the insertion of a label.
3. Measure the length or area on the drawing (for instructions on how to use the measuring tools see the chapter in this manual called Basic Editing and Dimensioning Tools.
4. Once you right‐click to end the measuring process, the quantity will be displayed in the CLI and it will be attached to your label, waiting for you to insert it.
5. Insert it the same way as outlined in the previous steps where AutoCount was used.
 Note:
Note:
If you wish to have measurements without inches and fractions, open the label panel settings and check Auto‐Minimize.
You can override the quantity that is calculated by the measuring tool by maximizing the label panel and manually entering a new quantity in the Label Qty. text box.