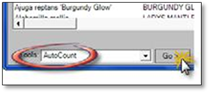
Follow these steps to insert a plant label into your drawing using the AutoCount option in the Plant Labeling Tool:
1. Choose the plant name you wish to use on your label.
2. Click on Go>> beside AutoCount. The labeling panel will temporarily minimize, giving you full view of your drawing for the insertion of a label.
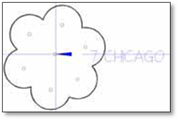
3. Left‐click on a group of shrubs or trees that have been clustered using the Clustering tool. You must click on part of the geometry of the grouping, not open space inside it.
 Note:
Note:
If the symbols have not been clustered, the resulting quantity will be one. When a figure or cluster is selected, the selected object will flash blue and the CLI will display the quantity of the selected figure or group of figures.
4. Next, click where you wish to start your leader. The first part of the label that will be inserted is the arrow at the end of the leader.
5. Move your mouse in the direction you wish the leader line to go and left‐ click a second time. You can continue left‐clicking to create more ‘elbows’ in the leader. To place the text and end the process, right‐click and the text will drop into place at the end of the leader. You may further adjust the appearance and alignment of you label after it is placed on the drawing page. Once the label is placed the panel will open up again so you can select another softscape.