Some users may want to print using the Entity Output Colors setting rather than the single-color setting when printing or saving as an image file.
This option is used when the previous option does not work:
1. Click on the Printer icon in DynaScape to open the Print Drawing panel.
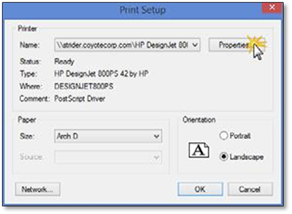
2. Click on the Printer Setup option to open the Print Setup panel.
3. Select the printer you wish to print to, the paper size and orientation (see the previous section for details).
4. Click on the Properties... option and set the printer’s output to color and click Ok.
5. This time in the Color tab of the Print Drawing panel choose the Print using output colors option.
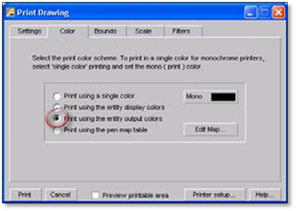
6. Set your bounds and scale correctly and click Print. The drawing will print with all black lines unless you have changed your Output Colors for the layers and the images will print in full color.
If some of the drawing’s elements do not print out in the color, you’d like then you will need to change the output colors of those elements. To do so, follow the next section outlining how to change the drawing’s output color.